
Get started
-
Choose Professional Learning from the main menu.
-
Click Configuration, then Credit Areas.
-
Click Course or Section to determine where the credit field will appear during course creation.
-
When multiple credits are applied to a course, select an option to determine whether a participant will select the credit they want to earn.
Manage credit areas
-
Click Add/Edit Credit Areas.
-
To add a credit area, click New Credit Area.
-
In the newly-added row, enter the Credit Area name and choose a corresponding Color.
-
Click the toggle to activate the credit area.
-
-
To reorder the credit areas, click Reorder.
-
Click a credit area handle to drag it to the desired location.
-
Click Back to Edit Credit Areas.
-
-
When finished, click Back to Credit Areas.
-
In the table, select the credit value types for each credit area.
Selections save automatically.
Manage credit value types
-
Click Add/Edit Credit Value Types.
-
To add a value type, click New Credit Value Type.
-
In the newly-added row, enter the Credit Value Type name.
-
Click the toggle to activate the value type.
-
-
To reorder the credit areas, click Reorder.
-
Click a credit area handle to drag it to the desired location.
-
Click Back to Edit Credit Value Types.
-
-
When finished, click Back to Credit Areas.
-
In the table, select the credit areas for each value type.
Selections save automatically.
Manage credit conversions
-
Click Add Credit Conversion.
-
Choose a Credit Area.
-
Choose the two Credit Value Types for the conversion.
-
Enter the conversion Ratio.
-
Click Add.
Configure credit areas
Administrators can now manage which credit areas are available in the course transfer credit system directly within PdAdmin. This capability was previously a legacy configuration option and has now been integrated into PdAdmin for easier access.
To enable:
-
Navigate to PdAdmin, Configuration, and select Credit Areas.
-
Review the list of credit areas.
-
Select Allowed in Transfer Credits for the required credit areas. Remember that atleast one credit area must remain enabled to avoid errors in Transfer Credit Management (TCM).
-
Click Save.
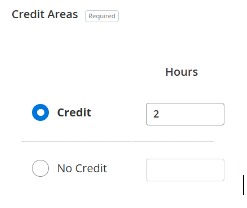
Credit areas and types designate what your end users earn upon completing a professional learning course.
Your baseline configuration credit areas are:
-
Credits – Hours
-
No Credit – Hours
-
Credit is assigned at the course level
-
One credit area is assigned per course
Credit Areas and Values will be visilbe on the Course Form. Course creators will assign a value for the applicable credit area when building the PL course.

If your district issues a different type of credit or if multiple credit areas need to be assigned to a course, you can modify these credit areas, types, and settings by navigating to Professional Learning > Configuration > Credit Areas.
Rename Credit-Hours to the credit name your district uses, like CEU Points.
Configuration checklist
-
Confirm if multiple credit areas apply to a course/section
-
Confirm credit area labels (add additional types as needed)
-
Confirm credit type labels (add additional types as needed)
You are now ready to Determine Course Types.