Staff Group
Staff groups are a means of grouping users who share attributes to facilitate easier selection in other areas of the portal. Staff groups can be utilized with the following features:
- Targeting an evaluation plan, observation template, mentoring plan, etc.
- Recommending, requiring, or restricting a course
- Targeting an announcement or calendar event
- Targeting a general survey
- Filtering a staff dashboard report
- Publishing/sharing an ad hoc report
Access Staff Groups
- Click Administration in the tabs along the top of the screen.
- From the System Administration menu, select Staff Groups.
Create/Edit a Staff Group
- On the Staff Groups page, do one of the following.

- To create a new staff group, select Create Staff Group.
- To edit an existing staff group, click the pencil icon or the group name for the desired group.
- Update the staff group name and description as necessary.
- To allow the staff group to be used for course targeting, select Can be used for course targeting. (All other options are checked by default.)
- All changes are saved automatically.
Members with Permissions
The Permissions tab is used to give other users edit rights for this staff group. This means this staff group will appear in their Staff Groups dashboard. Permissions are granted by manual selection.
Add User
Use this option to add users to a list through individual selection. Users added through this method will become static members (unaffected by changes to their location or demographics).
- From the action menu, select Add User.
- Use the search and filter features to narrow the list of users.
From the resulting list, use the checkboxes to select one, all, or multiple users.
When a user has already been added to the staff group, they will still show in the resulting list without a checkbox.

- When all users are selected, click Add.
Add User Advanced
Use this option to add users to a list in bulk. Users added through this method will become static members (unaffected by changes to their location or demographics).
- From the action menu, select Add User Advanced.
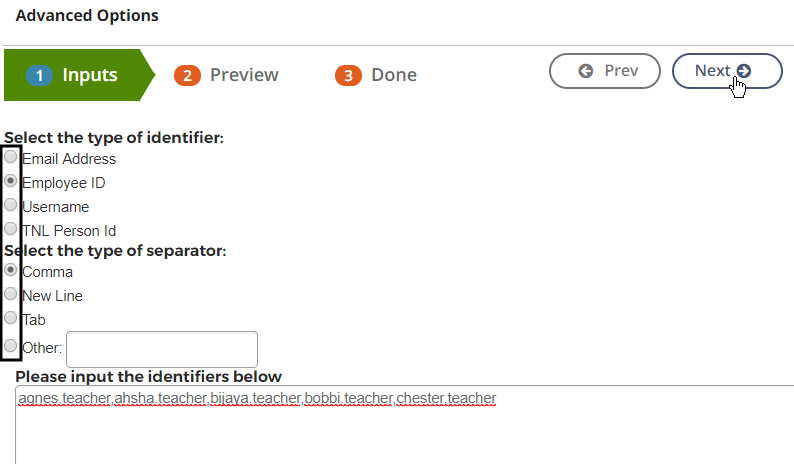
- Select the identifier and separator to be used in your list, and enter the list in the text box. Click Next.

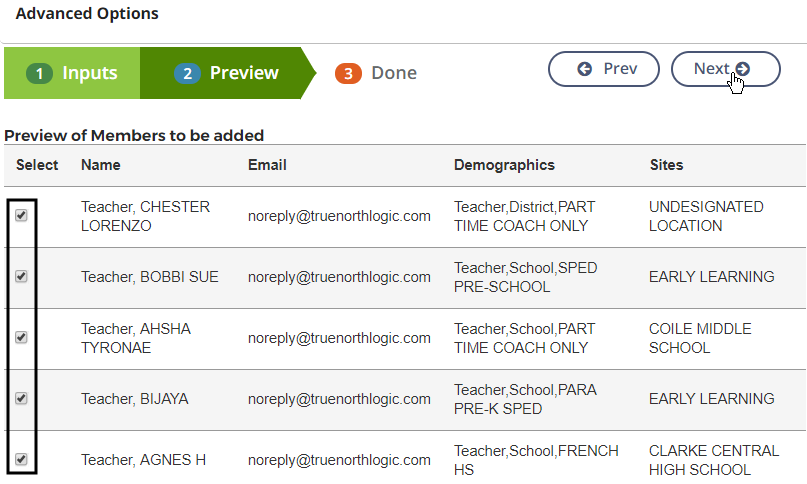
- Preview the list for accuracy. Deselect any user to remove them. Then click Next.

- A confirmation will appear. Click Done.
Manage Members with Permissions
All selections will be displayed in the Members with Permissions list. Click the trash can icon to remove a user.
Group Members
The Group Members tab is used to assign users to this staff group. Members are assigned by manual selection or by dynamic rule.
Add User by Member Rules
Use this option to add users to a list based on rules. Users added through this method will become dynamic (changes to their location and demographics may change their membership status).
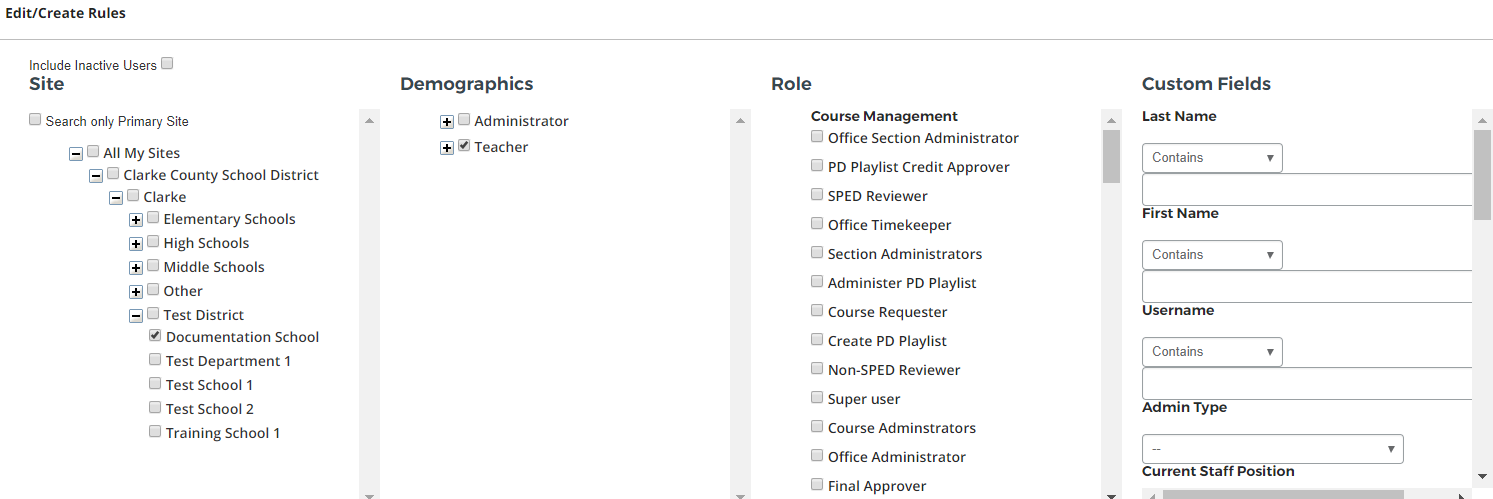
Rule criteria can be defined by site, demographics, role, or other user account field. Rules can be defined to include or exclude users meeting the rule criteria.
- To begin, click Add a Rule.
- Select the criteria as appropriate for the rule you want to create. One or multiple criteria can be selected.

- Once selections are complete, click one of the following.
- Include - all users meeting the selected criteria will be added to the list
- Exclude - all users meeting the selected criteria will be excluded from the list
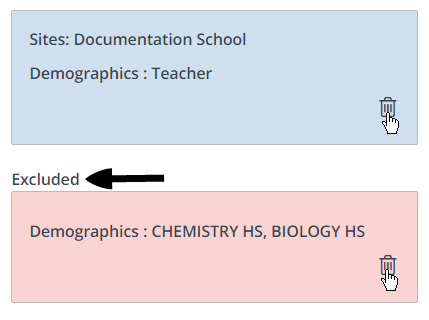
- All rules will be displayed, with exclusions highlighted. Click on a rule to edit it; click the trash can icon to remove it.

Manage Group Members
All selections will be displayed in the Group Members list.
Whether the user is a static or dynamic member is indicated. Static members can be removed by clicking the trash can icon. (Dynamic members can be changed only by updating the rule.)
Staff Groups can be used to create custom groups of users, if these groupings are not already available by site or demographic. They can be used for course targeting and reporting. Examples of common Staff Groups include:
New Hires for a school year (“New Hires 24-25")
Subject-Based Teachers across multiple Schools (“English Teachers – all schools,” “Special Education Staff,” etc.)
Pilot groups for specific district initiatives (“Pilot Group A”)
Users can be manually added to Staff Groups or automatically added based on Dynamic Rules. The member list of the Staff Group will be automatically updated as new users are added, or their user accounts are updated, if you define your list of users by Dynamic Rule.
Task
To create a Staff Group:
Go to Administration, Staff Groups.
Select Create Staff Group.
Give the group a Title.
Go to the Details & Permissions tab.
Select Can be used for Course Targeting.
Add any other users who should have permission to manage the users within the Staff Group by selecting the dropdown arrow next to “Add Filter” and select “Add User”. This step should be completed before adding Group Members. A user cannot be assigned Permissions over the Staff Group if they are already on the Group Members list. Once they are assigned Permissions over the Staff Group, they can be added to the Group Members list.
Go to the Group Members tab to either Manually Add Users to the group or create a Dynamic Rule to automatically organize users into the group.
For a Dynamic Rule, select Add Dynamic Rule. Select the criteria for the rule(s) that should apply to pull users into the Staff Group.
Assign multiple rules at once if the user must meet all criteria to be in the Staff Group
Assign rules one at a time if the user must meet at least one of the criteria to be in the Staff Group
Review your Staff Group list and exclude any users who need to be removed from the group rule.
https://vimeo.com/1089797938/ca607b46d7
Configuration checklist
Create a Staff Group and enroll users
You are ready to link calendars.
