Create a Course without Approval
Get Started
- Select Administration in the tabs along the top of the screen.
- In the Applications menu, select Course Administration.
- From the Learning Opportunities Administration menu, select Create New Learning Opportunity.
- Select Instructor-Led Course, PLC Learning Opportunity, or Self-Paced Learning Opportunity.
When creating a SCORM course, select Self-Paced Learning Opportunity.
Complete Course Details
Complete the course details. Form fields vary depending on course type and custom configurations for your organization.
These fields have special considerations.Provider - You will NOT be able to change the course provider selection once your course has been saved. Choose carefully whether the provider will be the district (default setting), SCORM, or a partner LMS.
Do not require section start and end times - Select to make a section available online at any time; class times will not be required when creating sections for this course.
- Start of Registration Date - Select the first date a participant can register for this course. This allows you to release a course into the catalog before registration begins.
- Disable Registration - Select to never allow a participant to register for this course. Use this to expose a course in your catalog that may have an alternate registration process.
Release Now and Or Release At - When approval is required, the course will not be available until approved by the course reviewer / approver. When creating a course for LMS integration, selections may need to be reserved until after the necessary corresponding course setup has been completed in the LMS.
To save your work while completing the form, click Save Draft. A course title and required fields must be entered to save a draft.
You have 60 minutes from the time you access this page until you save before the page is reset, and any information entered is lost. For longer forms, we recommend entering content in the required fields first, save the form, then continue filling out the optional fields.
When you complete the form, click Create... .
Complete Course Settings
Course setting selections determine which users are able to view and register for the course.
The Settings menu options vary depending on your organization's course type and custom configurations.
Availability
Only users with the selected locations can view this course in their catalogs.
If you do not select at least one location, the course will not appear in catalog results for any user.
- Click Set Locations.
- Use Select type to select the level at which you want to choose the location. (Options vary depending on your level of access.)
- Additional drop-down choices appear based on the level you selected. Use these to choose the specific location.
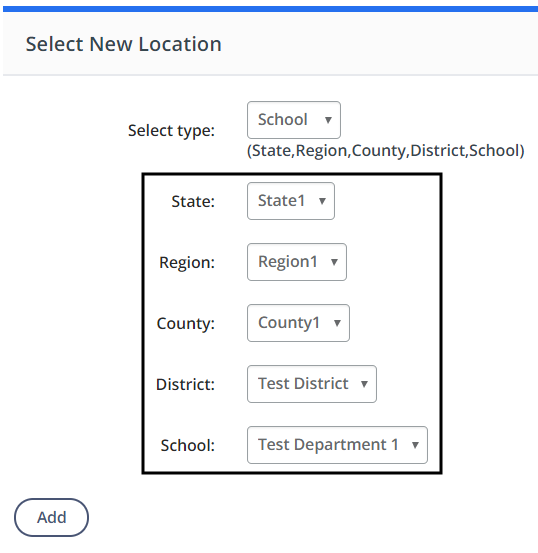
- Click Add.
- To remove a specific location, select the checkbox next to the desired location, then click Remove Selected.
- To remove all choices at once, click Remove All.
- Click Done.
Required Demographics
This setting displays the course in a Required Training channel for users with the selected demographics. It does not automatically enroll participants; they must still complete the registration process.
This setting should be used only if the course has an end date. If not, the course will remain in the channel indefinitely.
- Click Set Required.
- Select the checkbox next to the desired demographic role, then click Enable to change the demographic role name into a link.
- Click the link to access more-specific demographic choices.
- Select all applicable checkboxes, then click Save.
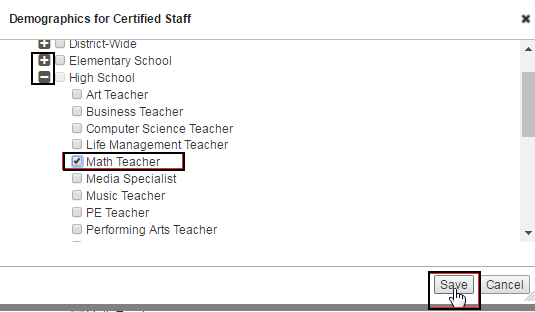
- Your demographic choices will be displayed.
- To disable a demographic role, select the checkbox next to the desired demographic role, then click Disable.
- To remove specific demographics, click the trash can icon to the left of the name.
- When finished setting demographics, click Done.
Click User Groups to select and enable predefined demographic groups.
Recommended Demographics
This setting displays the course in a Recommended Training channel for users with the selected demographics.
This setting should be used only if the course has an end date. If not, the course remains in the channel indefinitely.
You should not recommend and require the same course to the same demographic.
Click Set Recommended and follow the same steps as above to set recommended demographic criteria.
Restricted Demographics
Use this setting to restrict who can access the course in the catalog. This setting supersedes selections made under Required Demographics or Recommended Demographics.
Click Set Restricted and follow the same steps as above to set restricted demographic criteria.
Competencies
Use this setting to align your course to specific rubrics, elements, or standards.
- Click Align Rubrics.
- Select the desired competency from the drop-down selector, then click Go.
- Select the checkbox next to the desired elements, then click Align To Elements.
- To remove an element, click Delete.
- Click Done.
Subjects
Use his setting to align your course to a specific subject or support service.
- Click Align Subjects.
- Select the checkboxes next to the desired areas.
- Click Save.
Resources
Use this setting to associate resources for use by course participants.
- Click Manage Resources.
- To add a new resource, click Add Resource.
- Complete the required fields, then click Save.
To find and attach an existing resource from the content library, click Find Resource.
Use the Search Resources form to find the desired resource.
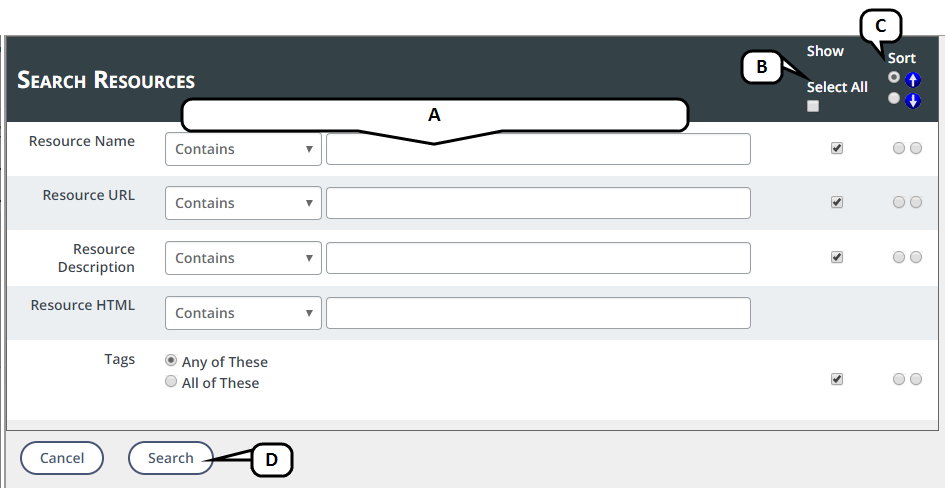
- Enter search criteria.
- Select columns to include in the results.
- If desired, select a column to sort results.
- Click Search.
- From the results, select the checkbox for the desired resource, then click Select.
- Click Finish.
Your linked resources will be displayed.
- To remove a resource, click the X.
- To change the window type in which the resource will display, select from the drop-down menu.
- To change the order in which the resources display for the participant, click Reorder Resources. Click and drag a resource to its desired spot. Then click Save.
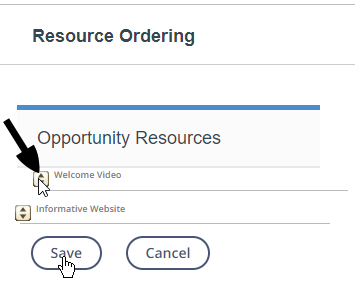
- Click Done.
Additional Fees
You can define required or optional fees in addition to any assessed for earning credit for the course.
- Click Fees.
- Click Add Fee for a credit type.
- Enter the fee description and cost. Select/deselect Required to determine if the fee must be assessed. (Optional fees can be deselected during the registration process.)
Add fees as necessary.
To offer the applying discounts option, enter the discount description and a negative amount as the cost.
- To remove a specific fee, click Remove.
- Click Save.
SCORM
If you are creating a SCORM course and selected SCORM as the course provider, you must configure the SCORM.
Click Configure SCORM.
If you are creating a new SCORM course, a message at the top of the SCORM configuration alerts that no SCORM files have been associated with this course.
Click Choose File to access files to add for the course.
Only .zip files can be added.
- Select the appropriate file, then click Add File.
- Once your file has been processed successfully, click Done.
Uploading SCORM files may take a few minutes. Do not navigate away from the page until the confirmation message appears that SCORM files have been uploaded successfully.
Create Course Sections
Every instructor-led course and PLC is required to have at least one section. (Participants enroll in sections.)
Click New Section.
A section cannot be added to a course saved as a draft.
Complete the form, noting that required fields are identified with an asterisk (*). Form fields will vary depending on district configurations. These fields have special considerations.
- Start Date - Select the first meeting date for this section. This determines the default first date when defining specific class times.
- End Date - Select the section's last meeting date. This determines the default end date when defining recurring class times.
- Start Time - Select the section's beginning meeting time. This determines the default start time when adding specific class times.
- End Time - Select the section's ending meeting time. This determines the default end time when adding specific class times.
- Start of Registration Date - Select the first date a Course Participant can register for this section. Use this setting to release a course into the catalog before registration begins.
- Disable Registration - Select this option to never allow a Course Participant to register for this section. Use this setting to expose a course in your catalog that may have an alternate registration process.
- Attendance Recorded - Select whether the section attendance will be taken once or twice a day. This determines the format of the sign-in sheet.
- Release Section Now - Select to make the section available in the catalog immediately. (When approval is required, the section will not be available until approval by the Course Reviewer / Approver.)
- Or Release Section At - Select the date and time to make the section available in the catalog. (When approval is required, the section will not be available until approved by the Course Reviewer / Approver.)
When creating a course for LMS integration, selections for Release Section Now and Or Release Section At should be reserved until after the necessary corresponding course setup has been completed in the LMS system.
- Click Create.
- Scroll to the bottom of the section summary to access buttons for additional section settings.
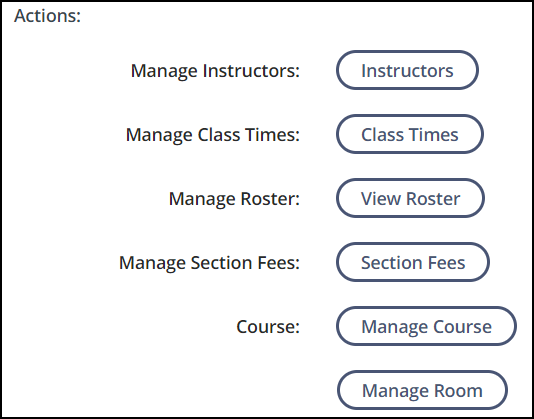
Manage Instructors / Moderators
This role is responsible for facilitating a section within the system. (This may or may not be the person actually teaching the section.) Functions include managing the roster, taking attendance, issuing credit, and managing communications.
The Course Requester and PD Administrators can manage the section by default.
Assign an additional Course Instructor or PLC Moderator following these steps.
- Click Instructors or Moderators (depending on the course type).
- Search for the user by first or last name, then click Find User.
- Select the checkbox for the desired user, then click Add User(s).
Selected users will be listed.
- To remove multiple users at once, select the checkboxes next to their names, then click Remove Selected.
- To remove a specific user, click the applicable trash can.
- Click Done.
Manage Class Times
Set the specific meeting days and times for your section.
Class times are required to create a sign-­in sheet and to support the feature that prevents participants from enrolling in sections with conflicting meeting times.
- Click Class Times.
- Click Add A New Class Time.
- The date and times default to the Start Date, Start Time, and End Time you entered on the section form. Adjust as needed.
- Continue to add class times and adjust as necessary.
The class schedule will be displayed.
- To remove all class times at once, click Remove All.
- To remove a specific class time, click Delete.
- To save your class times and keep working, click Save.
- When finished setting all class times, click Save & Exit.
If room management is enabled for your organization and role, room booking status is also be displayed. See Manage Rooms for more details on managing rooms for class times individually.
Manage Roster
Use this function once the course is active to manage the section roster. The button is disabled until the course/section has been approved (when necessary).
For more details, see Access Your Course Instructor / PLC Moderator Tools.
Manage Section Fees
Fees can be applied to a section in addition to any course fees.
- Click Section Fees.
- Click Add Fee to define a new fee for the respective credit type.
- Enter the fee description and cost. Select/deselect Required to determine if the fee must be assessed. (Optional fees can be deselected during the registration process.)
Continue to add fees as necessary.
If you want to offer the option to apply discounts, enter the discount description and a negative amount as the cost.
- To remove a specific fee, click Remove.
- Click Save.
Manage Rooms
If room management is enabled for your organization and your role, you can submit a room request along with your section. Follow these steps.
- Click Manage Room.
- Complete the form, noting that required fields are identified with an asterisk (*). The event title is pre-populated with your section title. Edit as appropriate.
- Click Next >>.
- To add another contact to your room request, click Add Co-Booker.
- Search for a user by first or last name, then click Search.
- Select the checkbox for the desired user, then click Add Selected.
- When finished adding co-bookers, click Done.
- Click Request a Room.
- Complete the room request form (required fields are in red text).
- The current schedule for the selected room and date will be displayed, so you can identify conflicts. Click the room name to view more detailed logistics.
- If needed, add recurring dates to support the section class times.
- Click Add Room.
- The room request will be displayed for each class time.
- To change a specific request, click Edit.
- To remove a specific request, click Delete.
- When finished creating the room request, click Back To Section at the top of the page.
Manage Rooms for Changing Class Dates / Times
Once a section with a room request is approved, its start date, end date, start time, and end time cannot be changed. This prevents errors and conflicts with room bookings.
If a change must be made to a class date or time, you can make adjustments from the Class Times page.
Click Class Times.

- If the room request is pending review, the class date and times cannot be changed. Click Cancel Request to enable updates and request a new room.
- If the room request has been approved, the class date and times cannot be changed. Click Cancel Room to enable updates and request a new room.
- If the room request has been denied, the class date and times can be changed. However, you need to click Delete Request to request a new room.
- If a room has not been requested, or you have canceled a room/request, the class date and times can be changed. Click Book to request a new room.
- Click Save & Exit.
Complete the Section
After completing all section details and settings, click Done.
Repeat the steps for adding sections as needed.
